本文实例为大家分享了unity shader百叶窗展示的具体代码,供大家参考,具体内容如下
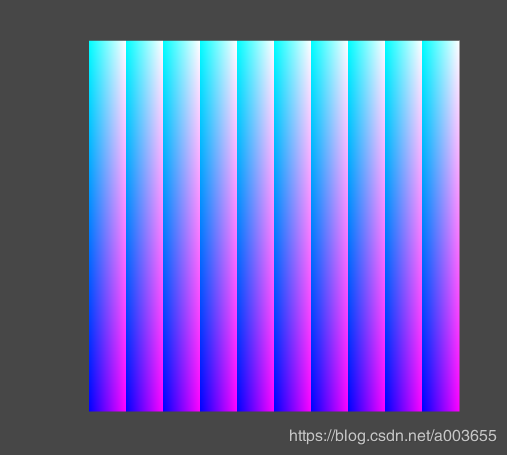
1.将图片划分为水平n栏,代码如下:
|
1
2
3
4
5
6
7
8
9
10
11
12
13
14
15
16
17
18
19
20
21
22
23
24
25
26
27
28
29
30
31
32
33
34
35
36
37
38
39
40
41
42
43
44
45
46
47
48
49
50
51
52
53
54
55
56
57
58
59
60
61
62
63
64
65
66
67
68
69
70
71
72
73
74
75
76
77
78
79
80
81
82
83
84
85
86
87
88
89
90
91
92
93
94
95
96
97
98
99
100
101
102
103
104
105
106
107
108
109
|
shader "unlit/bycshader"{ properties { [perrendererdata] _maintex ("sprite texture", 2d) = "white" {} _color ("tint", color) = (1,1,1,1) _stencilcomp ("stencil comparison", float) = 8 _stencil ("stencil id", float) = 0 _stencilop ("stencil operation", float) = 0 _stencilwritemask ("stencil write mask", float) = 255 _stencilreadmask ("stencil read mask", float) = 255 _colormask ("color mask", float) = 15 _lan("lan",float) = 10 [toggle(unity_ui_alphaclip)] _useuialphaclip ("use alpha clip", float) = 0 } subshader { tags { "queue"="transparent" "ignoreprojector"="true" "rendertype"="transparent" "previewtype"="plane" "canusespriteatlas"="true" } stencil { ref [_stencil] comp [_stencilcomp] pass [_stencilop] readmask [_stencilreadmask] writemask [_stencilwritemask] } cull off lighting off zwrite off ztest [unity_guiztestmode] blend srcalpha oneminussrcalpha colormask [_colormask] pass { name "default" cgprogram #pragma vertex vert #pragma fragment frag #pragma target 2.0 #include "unitycg.cginc" #include "unityui.cginc" #pragma multi_compile __ unity_ui_clip_rect #pragma multi_compile __ unity_ui_alphaclip struct appdata_t { float4 vertex : position; float4 color : color; float2 texcoord : texcoord0; unity_vertex_input_instance_id }; struct v2f { float4 vertex : sv_position; fixed4 color : color; float2 texcoord : texcoord0; float4 worldposition : texcoord1; unity_vertex_output_stereo }; v2f vert(appdata_t v) { v2f out; unity_setup_instance_id(v); unity_initialize_vertex_output_stereo(out); out.worldposition = v.vertex; out.vertex = unityobjecttoclippos(out.worldposition); out.texcoord = v.texcoord; out.color = v.color; return out; } sampler2d _maintex; float _lan; float4 frag(v2f in) : sv_target { //從這裡開始 float2 uv = in.texcoord; uv.x*= _lan; uv.x = frac(uv.x); return float4(uv.xy,1.0,1.0); } endcg } }} |

如上图,划分为n栏后,对每一栏进行单独处理,即可做到每一栏都同时进行颜色消减。
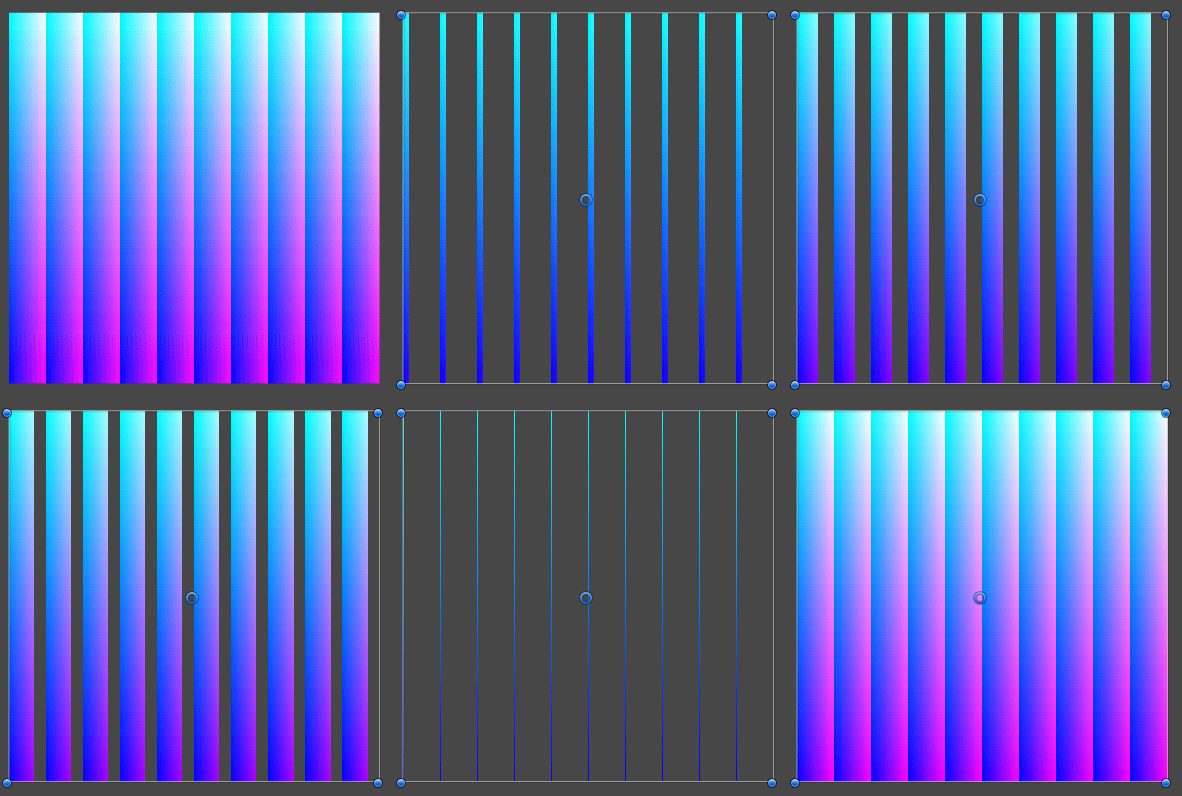
2.对每一栏同时进行颜色消减(控制阈值可以通过c#代码实现)
代码如下:
|
1
2
3
4
5
6
7
8
9
10
11
12
13
14
15
16
17
18
19
20
21
22
23
24
25
26
27
28
29
30
31
32
33
34
35
36
37
38
39
40
41
42
43
44
45
46
47
48
49
50
51
52
53
54
55
56
57
58
59
60
61
62
63
64
65
66
67
68
69
70
71
72
73
74
75
76
77
78
79
80
81
82
83
84
85
86
87
88
89
90
91
92
93
94
95
96
97
98
99
100
101
102
103
104
105
106
107
108
109
110
111
112
113
114
115
116
|
shader "unlit/bycshader"{ properties { [perrendererdata] _maintex ("sprite texture", 2d) = "white" {} _color ("tint", color) = (1,1,1,1) _stencilcomp ("stencil comparison", float) = 8 _stencil ("stencil id", float) = 0 _stencilop ("stencil operation", float) = 0 _stencilwritemask ("stencil write mask", float) = 255 _stencilreadmask ("stencil read mask", float) = 255 _colormask ("color mask", float) = 15 _lan("lan",float) = 10 _stepx("stepx",range(0.0,1.0))=1.0 [toggle(unity_ui_alphaclip)] _useuialphaclip ("use alpha clip", float) = 0 } subshader { tags { "queue"="transparent" "ignoreprojector"="true" "rendertype"="transparent" "previewtype"="plane" "canusespriteatlas"="true" } stencil { ref [_stencil] comp [_stencilcomp] pass [_stencilop] readmask [_stencilreadmask] writemask [_stencilwritemask] } cull off lighting off zwrite off ztest [unity_guiztestmode] blend srcalpha oneminussrcalpha colormask [_colormask] pass { name "default" cgprogram #pragma vertex vert #pragma fragment frag #pragma target 2.0 #include "unitycg.cginc" #include "unityui.cginc" #pragma multi_compile __ unity_ui_clip_rect #pragma multi_compile __ unity_ui_alphaclip struct appdata_t { float4 vertex : position; float4 color : color; float2 texcoord : texcoord0; unity_vertex_input_instance_id }; struct v2f { float4 vertex : sv_position; fixed4 color : color; float2 texcoord : texcoord0; float4 worldposition : texcoord1; unity_vertex_output_stereo }; v2f vert(appdata_t v) { v2f out; unity_setup_instance_id(v); unity_initialize_vertex_output_stereo(out); out.worldposition = v.vertex; out.vertex = unityobjecttoclippos(out.worldposition); out.texcoord = v.texcoord; out.color = v.color; return out; } sampler2d _maintex; float _lan; float _stepx; float4 frag(v2f in) : sv_target { float2 uv = in.texcoord; uv.x*= _lan; uv.x = frac(uv.x); //從這裡開始,顏色值大於指定值stepx的進行消減 int needdiscard = step(_stepx,uv.x); if(needdiscard == 1){ discard; } return float4(uv.xy,1.0,1.0); } endcg } }} |
效果如下:

3.加上切变,百叶窗在关闭打开时,是有透视变化的。用切变可以近似模拟透视,因为透视的实现代价很大,所以用切变。
添加一张图片,并进行切变

代码如下:
|
1
2
3
4
5
6
7
8
9
10
11
12
13
14
15
16
17
18
19
20
21
22
23
24
25
26
27
28
29
30
31
32
33
34
35
36
37
38
39
40
41
42
43
44
45
46
47
48
49
50
51
52
53
54
55
56
57
58
59
60
61
62
63
64
65
66
67
68
69
70
71
72
73
74
75
76
77
78
79
80
81
82
83
84
85
86
87
88
89
90
91
92
93
94
95
96
97
98
99
100
101
102
103
104
105
106
107
108
109
110
111
112
113
114
115
116
117
118
119
120
121
122
123
124
125
126
127
128
129
|
shader "unlit/bycshader"{ properties { [perrendererdata] _maintex ("sprite texture", 2d) = "white" {} _color ("tint", color) = (1,1,1,1) _stencilcomp ("stencil comparison", float) = 8 _stencil ("stencil id", float) = 0 _stencilop ("stencil operation", float) = 0 _stencilwritemask ("stencil write mask", float) = 255 _stencilreadmask ("stencil read mask", float) = 255 _colormask ("color mask", float) = 15 _lan("lan",float) = 10 _stepx("stepx",range(0.0,1.0))=1.0 [toggle(unity_ui_alphaclip)] _useuialphaclip ("use alpha clip", float) = 0 } subshader { tags { "queue"="transparent" "ignoreprojector"="true" "rendertype"="transparent" "previewtype"="plane" "canusespriteatlas"="true" } stencil { ref [_stencil] comp [_stencilcomp] pass [_stencilop] readmask [_stencilreadmask] writemask [_stencilwritemask] } cull off lighting off zwrite off ztest [unity_guiztestmode] blend srcalpha oneminussrcalpha colormask [_colormask] pass { name "default" cgprogram #pragma vertex vert #pragma fragment frag #pragma target 2.0 #include "unitycg.cginc" #include "unityui.cginc" #pragma multi_compile __ unity_ui_clip_rect #pragma multi_compile __ unity_ui_alphaclip struct appdata_t { float4 vertex : position; float4 color : color; float2 texcoord : texcoord0; unity_vertex_input_instance_id }; struct v2f { float4 vertex : sv_position; fixed4 color : color; float2 texcoord : texcoord0; float4 worldposition : texcoord1; unity_vertex_output_stereo }; v2f vert(appdata_t v) { v2f out; unity_setup_instance_id(v); unity_initialize_vertex_output_stereo(out); out.worldposition = v.vertex; out.vertex = unityobjecttoclippos(out.worldposition); out.texcoord = v.texcoord; out.color = v.color; return out; } sampler2d _maintex; float _lan; float _stepx; float4 frag(v2f in) : sv_target { //這裡進行裁剪 float2 uv = in.texcoord; uv.x*= _lan; uv.x = frac(uv.x); int needdiscard = step(_stepx,uv.x); if(needdiscard == 1){ discard; } //这里进行切变 float x1 = uv.x; uv = in.texcoord; uv+=float2(-0.5,-0.5); uv.x-=x1;//切變時,先將重心調整到中心,然后绕每一栏的起点进行切变(这里类似于绕某一点旋转,所以后面要进行反向操作,加了就减,减了就加) float2x2 qiebian = float2x2(1,0,(1.0-_stepx),1); uv = mul(qiebian,uv); uv-=float2(-0.5,-0.5); uv.x+=x1; float4 color= tex2d(_maintex, uv); return color; } endcg } }} |
效果如下:

以上就是本文的全部内容,希望对大家的学习有所帮助,也希望大家多多支持服务器之家。
原文链接:https://blog.csdn.net/a003655/article/details/87199386


