手写数字识别作为深度学习入门经典的识别案例,各种深度学习框架都有这个例子的实现方法。我这里将不用任何深度学习现有框架,例如TensorFlow、Keras、pytorch,直接使用Python语言的numpy实现各种激活函数、损失函数、梯度下降的方法。
程序分为两部分,首先是手写数字数据的准备,直接使用如下mnist.py文件中的方法load_minist即可。文件代码如下:
|
1
2
3
4
5
6
7
8
9
10
11
12
13
14
15
16
17
18
19
20
21
22
23
24
25
26
27
28
29
30
31
32
33
34
35
36
37
38
39
40
41
42
43
44
45
46
47
48
49
50
51
52
53
54
55
56
57
58
59
60
61
62
63
64
65
66
67
68
69
70
71
72
73
74
75
76
77
78
79
80
81
82
83
84
85
86
87
88
89
90
91
92
93
94
95
96
97
98
99
100
101
102
103
104
105
106
107
108
109
110
111
112
113
114
115
116
117
118
119
120
121
122
123
124
125
126
127
128
|
# coding: utf-8try: import urllib.requestexcept ImportError: raise ImportError('You should use Python 3.x')import os.pathimport gzipimport pickleimport osimport numpy as npurl_base = 'http://yann.lecun.com/exdb/mnist/'key_file = { 'train_img':'train-images-idx3-ubyte.gz', 'train_label':'train-labels-idx1-ubyte.gz', 'test_img':'t10k-images-idx3-ubyte.gz', 'test_label':'t10k-labels-idx1-ubyte.gz'}dataset_dir = os.path.dirname(os.path.abspath(__file__))save_file = dataset_dir + "/mnist.pkl"train_num = 60000test_num = 10000img_dim = (1, 28, 28)img_size = 784def _download(file_name): file_path = dataset_dir + "/" + file_name if os.path.exists(file_path): return print("Downloading " + file_name + " ... ") urllib.request.urlretrieve(url_base + file_name, file_path) print("Done") def download_mnist(): for v in key_file.values(): _download(v) def _load_label(file_name): file_path = dataset_dir + "/" + file_name print("Converting " + file_name + " to NumPy Array ...") with gzip.open(file_path, 'rb') as f: labels = np.frombuffer(f.read(), np.uint8, offset=8) print("Done") return labelsdef _load_img(file_name): file_path = dataset_dir + "/" + file_name print("Converting " + file_name + " to NumPy Array ...") with gzip.open(file_path, 'rb') as f: data = np.frombuffer(f.read(), np.uint8, offset=16) data = data.reshape(-1, img_size) print("Done") return data def _convert_numpy(): dataset = {} dataset['train_img'] = _load_img(key_file['train_img']) dataset['train_label'] = _load_label(key_file['train_label']) dataset['test_img'] = _load_img(key_file['test_img']) dataset['test_label'] = _load_label(key_file['test_label']) return datasetdef init_mnist(): download_mnist() dataset = _convert_numpy() print("Creating pickle file ...") with open(save_file, 'wb') as f: pickle.dump(dataset, f, -1) print("Done!")def _change_one_hot_label(X): T = np.zeros((X.size, 10)) for idx, row in enumerate(T): row[X[idx]] = 1 return T def load_mnist(normalize=True, flatten=True, one_hot_label=False): """读入MNIST数据集 Parameters ---------- normalize : 将图像的像素值正规化为0.0~1.0 one_hot_label : one_hot_label为True的情况下,标签作为one-hot数组返回 one-hot数组是指[0,0,1,0,0,0,0,0,0,0]这样的数组 flatten : 是否将图像展开为一维数组 Returns ------- (训练图像, 训练标签), (测试图像, 测试标签) """ if not os.path.exists(save_file): init_mnist() with open(save_file, 'rb') as f: dataset = pickle.load(f) if normalize: for key in ('train_img', 'test_img'): dataset[key] = dataset[key].astype(np.float32) dataset[key] /= 255.0 if one_hot_label: dataset['train_label'] = _change_one_hot_label(dataset['train_label']) dataset['test_label'] = _change_one_hot_label(dataset['test_label']) if not flatten: for key in ('train_img', 'test_img'): dataset[key] = dataset[key].reshape(-1, 1, 28, 28) return (dataset['train_img'], dataset['train_label']), (dataset['test_img'], dataset['test_label']) if __name__ == '__main__': init_mnist() |
使用上述文件中的函数就可以直接得到手写数字的训练数据、训练标签,测试样本以及测试标签。
接下里使用如下代码就可以进行手写数字的训练,代码如下:
|
1
2
3
4
5
6
7
8
9
10
11
12
13
14
15
16
17
18
19
20
21
22
23
24
25
26
27
28
29
30
31
32
33
34
35
36
37
38
39
40
41
42
43
44
45
46
47
48
49
50
51
52
53
54
55
56
57
58
59
60
61
62
63
64
65
66
67
68
69
70
71
72
73
74
75
76
77
78
79
80
81
82
83
84
85
86
87
88
89
90
91
92
93
94
95
96
97
98
99
100
101
102
103
104
105
106
107
108
109
110
111
112
113
114
115
116
117
118
119
120
121
122
123
124
125
126
127
128
129
130
131
132
133
134
135
136
137
138
139
140
141
142
143
144
145
146
147
148
149
150
151
152
153
154
155
156
157
158
159
160
161
162
163
164
165
166
167
168
169
170
171
172
173
174
175
176
177
178
179
180
181
182
183
184
|
import numpy as npfrom numpy.lib.function_base import selectfrom dataset.mnist import load_mnistimport matplotlib.pylab as pltdef sigmoid(x): return 1 / (1 + np.exp(-x)) def sigmoid_grad(x): return (1.0 - sigmoid(x)) * sigmoid(x)def softmax(x): if x.ndim == 2: x = x.T x = x - np.max(x, axis=0) y = np.exp(x) / np.sum(np.exp(x), axis=0) return y.T x = x - np.max(x) # 溢出对策 return np.exp(x) / np.sum(np.exp(x))def cross_entropy_error(y, t): if y.ndim == 1: t = t.reshape(1, t.size) y = y.reshape(1, y.size) # 监督数据是one-hot-vector的情况下,转换为正确解标签的索引 if t.size == y.size: t = t.argmax(axis=1) batch_size = y.shape[0] return -np.sum(np.log(y[np.arange(batch_size), t] + 1e-7)) / batch_sizedef numerical_gradient(f, x): h = 1e-4 # 0.0001 grad = np.zeros_like(x) it = np.nditer(x, flags=['multi_index'], op_flags=['readwrite']) while not it.finished: idx = it.multi_index tmp_val = x[idx] x[idx] = float(tmp_val) + h fxh1 = f(x) # f(x+h) x[idx] = tmp_val - h fxh2 = f(x) # f(x-h) grad[idx] = (fxh1 - fxh2) / (2*h) x[idx] = tmp_val # 还原值 it.iternext() return grad#(x_train,t_train),(x_test,t_test)=load_mnist(normalize=True,one_hot_label=True)#两层神经网络的类class TwoLayerNet: def __init__(self,input_size,hidden_size,output_size,weight_init_std=0.01): #初始化权重 self.params={} self.params['W1']=weight_init_std*np.random.randn(input_size,hidden_size) self.params['b1']=np.zeros(hidden_size) self.params['W2']=weight_init_std*np.random.randn(hidden_size,output_size) self.params['b2']=np.zeros(output_size) def predict(self,x): W1,W2=self.params['W1'],self.params['W2'] b1,b2=self.params['b1'],self.params['b2'] a1=np.dot(x,W1)+b1 z1=sigmoid(a1) a2=np.dot(z1,W2)+b2 y=softmax(a2) return y #损失函数 def loss(self,x,t): y=self.predict(x) return cross_entropy_error(y,t) #数值微分法 def numerical_gradient(self,x,t): loss_W=lambda W:self.loss(x,t) grads={} grads['W1']=numerical_gradient(loss_W,self.params['W1']) grads['b1']=numerical_gradient(loss_W,self.params['b1']) grads['W2']=numerical_gradient(loss_W,self.params['W2']) grads['b2']=numerical_gradient(loss_W,self.params['b2']) return grads #误差反向传播法 def gradient(self, x, t): W1, W2 = self.params['W1'], self.params['W2'] b1, b2 = self.params['b1'], self.params['b2'] grads = {} batch_num = x.shape[0] # forward a1 = np.dot(x, W1) + b1 z1 = sigmoid(a1) a2 = np.dot(z1, W2) + b2 y = softmax(a2) # backward dy = (y - t) / batch_num grads['W2'] = np.dot(z1.T, dy) grads['b2'] = np.sum(dy, axis=0) da1 = np.dot(dy, W2.T) dz1 = sigmoid_grad(a1) * da1 grads['W1'] = np.dot(x.T, dz1) grads['b1'] = np.sum(dz1, axis=0) return grads #准确率 def accuracy(self,x,t): y=self.predict(x) y=np.argmax(y,axis=1) t=np.argmax(t,axis=1) accuracy=np.sum(y==t)/float(x.shape[0]) return accuracyif __name__=='__main__': (x_train,t_train),(x_test,t_test)=load_mnist(normalize=True,one_hot_label=True) net=TwoLayerNet(input_size=784,hidden_size=50,output_size=10) train_loss_list=[] #超参数 iter_nums=10000 train_size=x_train.shape[0] batch_size=100 learning_rate=0.1 #记录准确率 train_acc_list=[] test_acc_list=[] #平均每个epoch的重复次数 iter_per_epoch=max(train_size/batch_size,1) for i in range(iter_nums): #小批量数据 batch_mask=np.random.choice(train_size,batch_size) x_batch=x_train[batch_mask] t_batch=t_train[batch_mask] #计算梯度 #数值微分 计算很慢 #grad=net.numerical_gradient(x_batch,t_batch) #误差反向传播法 计算很快 grad=net.gradient(x_batch,t_batch) #更新参数 权重W和偏重b for key in ['W1','b1','W2','b2']: net.params[key]-=learning_rate*grad[key] #记录学习过程 loss=net.loss(x_batch,t_batch) print('训练次数:'+str(i)+' loss:'+str(loss)) train_loss_list.append(loss) #计算每个epoch的识别精度 if i%iter_per_epoch==0: #测试在所有训练数据和测试数据上的准确率 train_acc=net.accuracy(x_train,t_train) test_acc=net.accuracy(x_test,t_test) train_acc_list.append(train_acc) test_acc_list.append(test_acc) print('train acc:'+str(train_acc)+' test acc:'+str(test_acc)) print(train_acc_list) print(test_acc_list) # 绘制图形 markers = {'train': 'o', 'test': 's'} x = np.arange(len(train_acc_list)) plt.plot(x, train_acc_list, label='train acc') plt.plot(x, test_acc_list, label='test acc', linestyle='--') plt.xlabel("epochs") plt.ylabel("accuracy") plt.ylim(0, 1.0) plt.legend(loc='lower right') plt.show() |
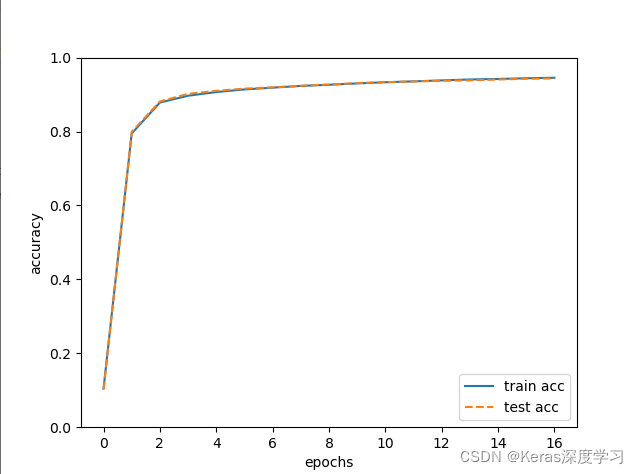
训练完成后,查看绘制准确率的图片,可以获取到成功实现了手写数字识别。

随着训练批次的增加,准确率逐渐增大接近于1,说明训练过程按着正确拟合的方向前进。
到此这篇关于纯numpy实现数值微分法实现手写数字识别的文章就介绍到这了,更多相关numpy 手写数字识别内容请搜索服务器之家以前的文章或继续浏览下面的相关文章希望大家以后多多支持服务器之家!
原文链接:https://keras-lx.blog.csdn.net/article/details/122477788


