硬盘的容量=主分区的容量+扩展分区的容量
扩展分区的容量=各个逻辑分区的容量之和
一块物理硬盘只能有: 一到四个主分区(但其中只能有一个是活动的主分区),或一到三个主分区,和一个扩展分区。分别对应hda1,hda2,hda3,hda4.
Linux 中规定,每一个硬盘设备最多能有 4 个主分区(其中包含扩展分区)构成,任何一个扩展分区都要占用一个主分区号码,也就是在一个硬盘中,主分区和扩展分区一共最多是 4 个。
我曾经的困惑点是:不知道扩展分区要占用主分区(最多可以有4个)一个分区号码。
我的总结:一块硬盘可以只设主分区,这时主分区可设置4个分区号。也可以设置成主分区+逻辑分区,这时也是最多4个分区号码,但是变成了4 = 3 + 1.其中4是主分区和扩展分区加起来最多4个; 3是主分区,可以小于或等于3; 1是扩展分区号,占用了一个主分区号。从5开始到16,都是逻辑分区。如果只有一个5,则扩展分区不再进行分区了,那么扩展分区就是逻辑分区了(扩展分区的磁盘总量等于一个逻辑分区的磁盘总量)。常见的是扩展分区被分成几个逻辑分区,用5,6,7,8等号码标识。
如果你在Linux系统中格式化磁盘时遇到如下错误,那么表示你正在格式化一个扩展分区。
[root@GETTestLNX06 ~]# mkfs.ext4 /dev/sdb1
mke2fs 1.41.12 (17-May-2010)
mkfs.ext4: inode_size (128) * inodes_count (0) too big for a
filesystem with 0 blocks, specify higher inode_ratio (-i)
or lower inode count (-N).
直接格式化扩展分区是不允许的,只能格式化主分区和逻辑分区。那么那么应该如何格式化一个扩展分区呢,我们要么删除该扩展分区,创建一个主分区;要么在扩展分区上创建逻辑分区,如下操作所示
1: 创建逻辑分区
[root@GETTestLNX06 ~]# fdisk /dev/sdb
WARNING: DOS-compatible mode is deprecated. It's strongly recommended to
switch off the mode (command 'c') and change display units to
sectors (command 'u').
Command (m for help): p
Disk /dev/sdb: 107.4 GB, 107374182400 bytes
255 heads, 63 sectors/track, 13054 cylinders
Units = cylinders of 16065 * 512 = 8225280 bytes
Sector size (logical/physical): 512 bytes / 512 bytes
I/O size (minimum/optimal): 512 bytes / 512 bytes
Disk identifier: 0xd61351c9
Device Boot Start End Blocks Id System
/dev/sdb1 1 13054 104856223+ 5 Extended
Command (m for help): n
Command action
l logical (5 or over)
p primary partition (1-4)
l
First cylinder (1-13054, default 1): 1
Last cylinder, +cylinders or +size{K,M,G} (1-13054, default 13054):
Using default value 13054
Command (m for help): p
Disk /dev/sdb: 107.4 GB, 107374182400 bytes
255 heads, 63 sectors/track, 13054 cylinders
Units = cylinders of 16065 * 512 = 8225280 bytes
Sector size (logical/physical): 512 bytes / 512 bytes
I/O size (minimum/optimal): 512 bytes / 512 bytes
Disk identifier: 0xd61351c9
Device Boot Start End Blocks Id System
/dev/sdb1 1 13054 104856223+ 5 Extended
/dev/sdb5 1 13054 104856192 83 Linux
Command (m for help): w
The partition table has been altered!
Calling ioctl() to re-read partition table.
Syncing disks.
2:格式化逻辑分区
[root@GETTestLNX06 ~]# mkfs.ext4 /dev/sdb5
mke2fs 1.41.12 (17-May-2010)
Filesystem label=
OS type: Linux
Block size=4096 (log=2)
Fragment size=4096 (log=2)
Stride=0 blocks, Stripe width=0 blocks
6553600 inodes, 26214048 blocks
1310702 blocks (5.00%) reserved for the super user
First data block=0
Maximum filesystem blocks=4294967296
800 block groups
32768 blocks per group, 32768 fragments per group
8192 inodes per group
Superblock backups stored on blocks:
32768, 98304, 163840, 229376, 294912, 819200, 884736, 1605632, 2654208,
4096000, 7962624, 11239424, 20480000, 23887872
Writing inode tables: done
Creating journal (32768 blocks): done
Writing superblocks and filesystem accounting information: done
This filesystem will be automatically checked every 28 mounts or
180 days, whichever comes first. Use tune2fs -c or -i to override.
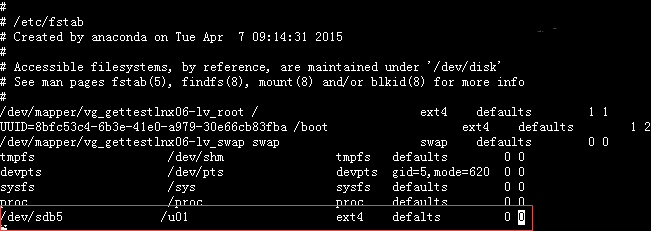
3:将挂载信息写入配置文件
编辑
4:挂载新建的分区
[root@GETTestLNX06 ~]# cd /
[root@GETTestLNX06 /]# mkdir u01
[root@GETTestLNX06 /]# mount -a
[root@GETTestLNX06 /]# df -h
Filesystem Size Used Avail Use% Mounted on
/dev/mapper/vg_gettestlnx06-lv_root
44G 2.3G 40G 6% /
tmpfs 3.9G 0 3.9G 0% /dev/shm
/dev/sda1 477M 33M 419M 8% /boot
/dev/sdb5 99G 60M 94G 1% /u01
[root@GETTestLNX06 /]#


